Friday, September 25, 2015

DIY Coasters

Coasters are useful and enjoyable for many occasions. Whether it be to sit beneath your drink or protect your furniture from spills, coasters are always a fun way to spruce up your coffee table! Some may say that paying the overpriced fees of coasters is unnecessary, and that the designs shown on them aren't even worth the price! There IS another option! Now, using easy to find household items, you can create your very own coasters with whichever picture or pattern that you choose! Follow these simple steps, and in no time at all, you will have an extraordinary DIY coaster of your very own.

What you will need:
-4x4 White tile (I bought mine at my local hardware store for around 50 cents a piece)
-Printer paper
-Glossy mod podge (matte may ruin the image)
-Sponge paint brush
-4x4 felt piece


Step One: Print out a 4x4 picture of your choice. You can print whatever you'd like, but I chose to do a quote from “The Hunger Games.”


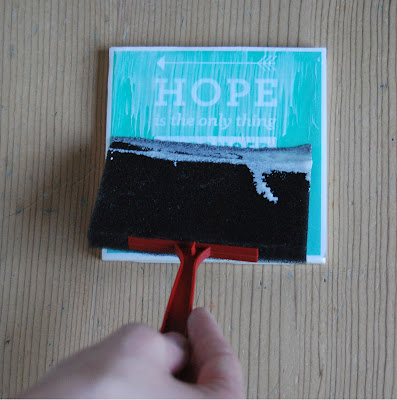
Step Two: Using your sponge brush, evenly spread a thick layer of mod podge onto your tile.


Step Three: Place your printed image on the tile. Allow 15 - 20 minutes to dry.


Step Four: Spread another layer of mod podge on top of the picture, paying special attention to edges and corners. Allow 15 – 20 minutes to dry.


Step Five: Flip the tile over and spread a thin layer of mod podge on the bottom of the tile.


Step Six: Lay your 4x4 piece of felt on the tile. This is an especially important step, as forgetting to do so may lead to scratches on your table.


Step Seven (Optional): Using mod podge should waterproof the coaster, but just to be sure you can spray on a thin layer of sealant.


If you followed these steps correctly, you should now have a fully customized coaster for all of your drink-placing needs! The best part of these is that you can use literally any picture that you want! All you need is a color printer! I hope this DIY is useful and fun for you and your friends! Stay crafty!

Thursday, September 17, 2015

DIY Phone Case

Individualized phone cases are a great way to express your personality and show others what you're into! With the new school year starting, a unique phone case that displays what you love will definitely be a great conversation starter and kick off a fun new year. That being said, have you ever wanted to spice up your phone case but didn't have the time, resources, or funds to do so? If you answered yes, this blog post is perfect for you! Today, I'm going to show you how to make extremely inexpensive phone cases that are interchangeable and mix-and-matchable! Follow these simple steps and in no time at all you will have a fabulous DIY phone case of your very own!

What you will need:
-Clear phone case that corresponds with your phone model/size (I bought a pack of 7 from Amazon for around $10.)
-Scrapbook paper (You can also print out an image of your choice)
-Exacto knife
-Scissors
-Pencil


Step One: On the scrapbook paper, trace the outline of your phone with a pencil. Make sure not to trace the case, as the phone is the exact size that you will need to complete this project.


Step Two: Precisely cut out the shape, paying close attention to corners and curves.


Step Three: Place the paper inside of the clear case, and trace the outline of the camera. This is an extremely important step, as forgetting to do so will lead to a blocked camera lens.


Step Four: Using an exacto knife, cut out the shape of the camera. Place the completed paper into the case facing out and put the phone on top of it. Be careful not to rip the paper.


And Voila! Now you have a fully customizable phone case that you made for practically no money at all! Use photos, stickers, and even printed images to enhance your case even further! Using this method lets you switch out your paper whenever you want, allowing for infinite combinations for your ever changing personality ! I hope you have fun doing this project on your own! Stay crafty!