Wednesday, December 21, 2016

DIY Clay Bowl

Hello, friends! Welcome back! Today I'm going to be doing something extra special that involves a material I've never really used before today. Clay! There's two main reasons why I've never become comfortable with clay prior to this activity, one being that the strength needed to mold and shape it HURTS YOUR HANDS. The other, more important, reason is that I'm not the best at drawing or sculpting. This craft, though, seemed to be very simple to complete and didn't require too much time or effort. So I went for it! And if I can tell you one thing, it's that I am definitely not disappointed. Today we are going to be making a beautifully colored clay bowl. Let's get started!

What you will need:
-Clay (We used Polymer Clay - two or more colors)
-A bowl or cup of any size


Step One: Roll out your two colors of clay. Like I said before, this WILL start hurt your hands, but it gets easier as you go along.


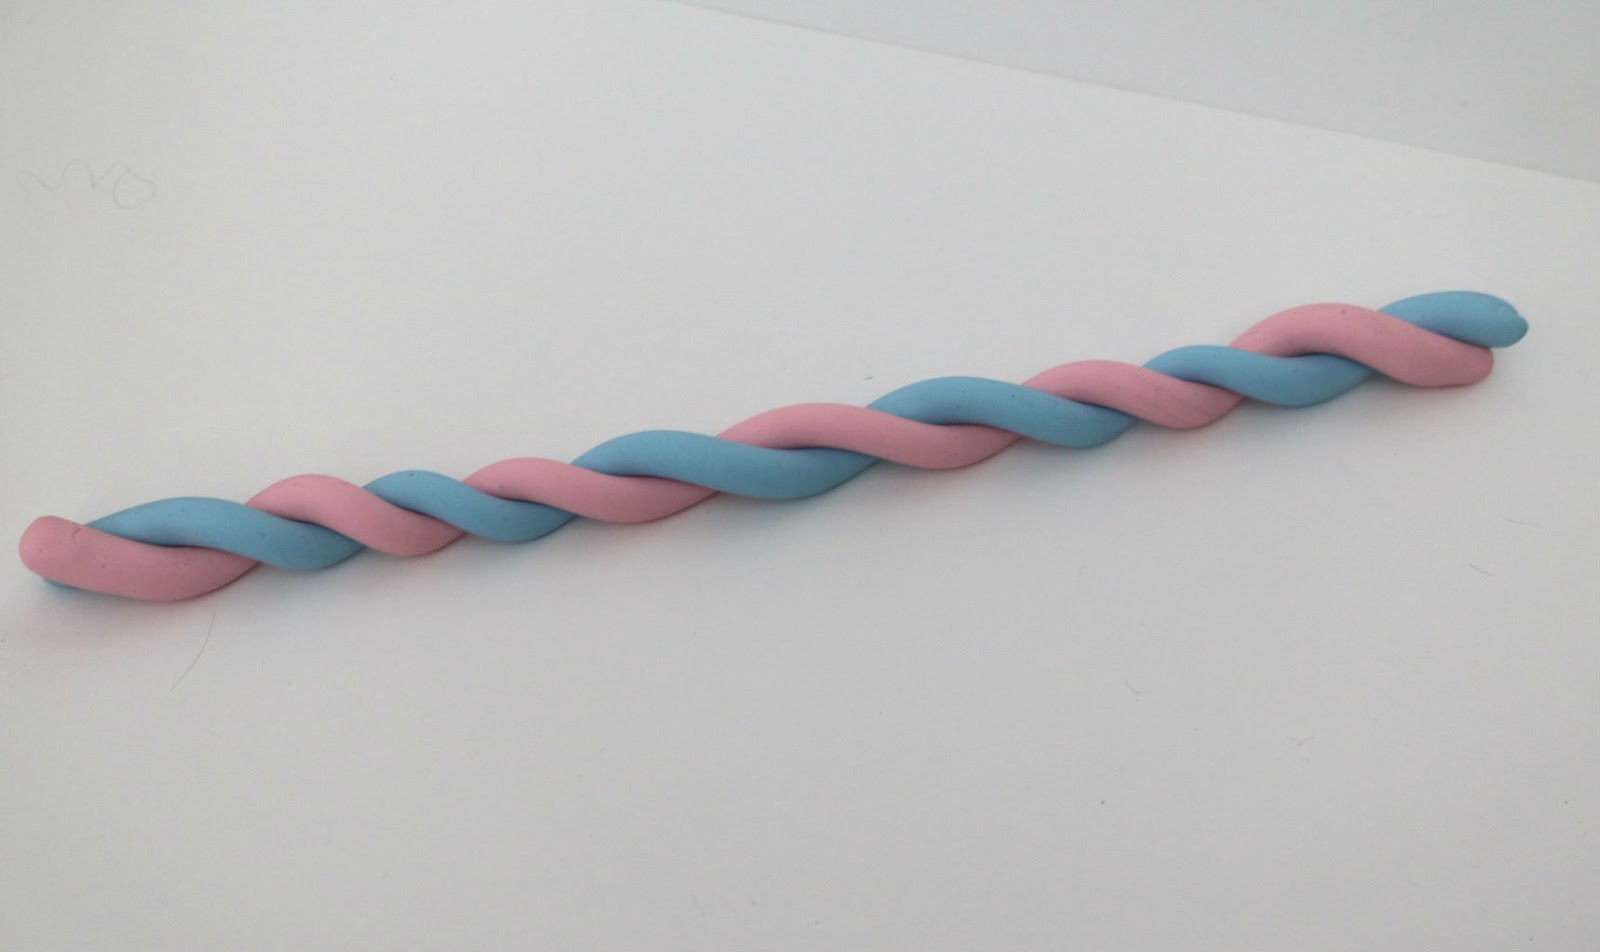
Step Two: Roll up your two pieces of clay so that they are bending around each other. The tighter you make it, the better your bowl will look.


Step Three: Roll your two combined strips into a ball.


Step Four: Using a rolling pin, roll out the clay and place it into your cup or bowl so it takes its desired form. Once you remove it, follow the directions on your clay packaging to know how long to bake it for.


And there you have it! A beautiful homemade clay bowl! If you want to spruce things up a bit, you can add a small rim of gold sharpie like I did below! Anyway, this craft can be used to store and display almost any small item, and definitely looks great set upon your coffee table or bathroom counter. This project could also be used as a ring tray, and is perfect for storing small jewelry. Another option would be to give this as a present to a friend or loved one! I hope your clay bowl turns out as well as mine did and have an amazing day! Stay crafty!


Wednesday, November 2, 2016

DIY Light-Up Glitter Jars

Light-up glitter jars are a great way to add some magic and shine into your living space! Make one for yourself, or use them as beautiful gifts for loved ones. In addition to being whimsical, these jars have a practical purpose too. Hide special objects or trinkets inside to keep your memories safe. This DIY even has a customizable label that can say anything you desire! The options are limitless! And considering the price of this DIY, it's probably a good idea to create your own jar instead of scavenging high-priced stores to buy a pre-made one. Continue reading, and you will learn how to make beautiful DIY light-up glitter jars of your very own!

What you will need:
-Mason jar
-Glue
-Loose glitter
-Sticker labels
-Sponge brush or paint brush
-Small LED flameless candle


Step One: Take a mason jar and spread a thin layer of glue around the entire interior of the jar.


Step Two: Pour a small amount of glitter into the jar. Close the lid and shake thoroughly. Continue adding glitter and shaking the jar until the entire interior of the jar is covered in glitter. When finished, be sure to dump the excess glitter outside or into a trash can. Allow a couple of hours to dry. WARNING: Be sure to complete this step outside, as the glitter will go everywhere.


Step Three: Choose a special word or phrase and write it on the label.


Step Four: Stick the label onto the jar, being sure to center it.


Step Five: Turn on your small LED candle and place it inside of the jar. Close the lid. Place the jar in a dark room for full effect.


And now you have a light-up glitter jar for you and your friends to enjoy!This creation really looks amazing in dim lighting and works as an even better night light. Anyone that you give this craft to is sure to love it, and all you need to make it is a few easy-to-find supplies! I hope you enjoyed this DIY and use it as much as I do! Stay crafty!


Tuesday, November 1, 2016

DIY Sprinkle Rimmed Glasses


Hey guys! Happy new year! I hope you are all having an amazing time in 2016 so far. I know I am! On a different note, I am very happy to inform you that I have a brand new DIY to share with you guys! This craft is a bit different than the rest for only one reason... It involves FOOD! Dessert, to be exact. What could be better, am I right? Today we are going to make sprinkle rimmed glasses! I know this sounds a bit weird, but this project is honestly one of the easiest that I've ever done and takes no more then 5 minutes. Another plus is that literally everything I needed to make this was in my kitchen cupboard. This colorful dessert is perfect for any event – birthdays especially. It's also fully customizable based on your favorite colors, flavors, and drinks! Let's begin, shall we?

What you will need:
-A glass of your choice
-Frosting
-Sprinkles
-Two small plates/bowls
-Food coloring (optional)


Step 1: Take the lid off of your frosting.


Step 2: Spread a good amount of frosting onto your first bowl/plate. Make sure the size of the frosting corresponds with the rim of your glass.


Step 3: Pour your sprinkles into your second plate/bowl. (Any color combination is okay. I personally chose to use rainbow.) You might want to do this over a sink because if you mess up, the sprinkles will go EVERYWHERE.


Step 4: Carefully turn your glass upside down and place it into the frosting, making sure to cover the entire rim. When you remove your glass, you might want to smooth out the frosting with a knife to make it look nicer.


Step 5: Do the same with your sprinkles. When you take the glass out, carefully shake it to remove the excess.


And there you have it! That's all you need to make your very own sprinkle rimmed glasses! Like I said before, this craft is fully customizable and can be done using any color frosting or sprinkles. Even what you put inside is completely up to you! After I let the glass sit and harden for a couple minutes, I poured in a bit of vanilla milk to make this craft fully functioning. If you're feeling extra colorful when doing this, you can even pour in a couple drops of food coloring. And for the finishing touch, something that every dessert is better with: Whipped cream! I hope you have a wonderful time making this yummy project! Stay crafty!


Monday, October 31, 2016

DIY Rainbow Pumpkin

Happy Halloween everyone! Today is the scariest day of the year, and I thought it would only be fitting to post one last Halloween DIY for you guys. In my opinion, this project is my favorite out of the three, and I'm really exited to share it with you. Today, I am making a DIY rainbow pumpkin! Since my favorite color is rainbow (obviously), this craft makes me smile every time I see it! The materials needed are extremely inexpensive, and the outcome is undoubtedly beautiful. Let's get started!

What you will need:
-Pumpkin
-Crayons
-Gloves 
-White spray paint
-Hot glue gun
-Portable Hair Dryer (And extension chord)

Step One: Spray paint your pumpkin white. This will cause the colors you choose to pop. I highly recommend conducting this activity outside, as the paint can and will go everywhere. Place your pumpkin inside of a box or an empty trash can to contain the paint.


Step Two: Let the pumpkin dry for 20-30 minutes. While you're doing so, choose the crayons you want to use on your pumpkin. If you don't decide to create a rainbow pattern, make sure the colors blend nicely.
Not following this step may lead to some unwanted mixtures on your pumpkin. 


Step Three: Peel the crayons that you've chosen. An easy way get the wrappers off is to place the crayons in water for a couple minutes. The paper will slip right off.


Step Four: Break the crayons in half and hot glue them on to the pumpkin. Make sure you have a rough estimate of where each crayon will go before you glue so you don't place them too close together or too far apart.


Step Five: Use your hair dryer to melt your crayons. This step should also take place outside, so make sure to find an extension chord long enough to reach. I recommend laying out an old sheet or towel under the pumpkin so you don't make a mess. This step may be time consuming, but it's definitely worth it in the end. If you really get bored, which you most likely won't, you could bring your phone outside and jam to some music as you watch your creation take form!


And there you have it! Your very own DIY rainbow pumpkin! This project turns out beautiful no matter how many "mistakes" you make, and it will definitely cause some trick or treaters to stop in their tracks. This is also a beautiful alternative to carving pumpkins, a messy and gross process that many would rather not endure. You could use all red crayons to represent blood, or your favorite sports colors to show your team spirit. The options are limitless! Now you just have to go out and try it. Stay crafty! 


Wednesday, September 28, 2016

DIY Ombre Bookmark

Hey everyone! I am back again with my second post of the day! Hooray! So recently, I've been reading a couple of books at the same time (To Kill a Mockingbird, Harry Potter and Chamber of Secrets, Mockingjay) and I always lose track of which page I'm on. It's pretty annoying trying to remember each time I open up a book, and searching through the pages just takes away precious reading time - which many of you will agree is never okay. The constant struggle has finally lead to me do something about this, and I sure am glad that I did. Today, I am going to be creating a DIY ombre bookmark for all of your reading needs! Creating this is easier than you'd expect, and surely doesn't take more than 5 minutes. Let's begin!

What you will need:
-Paint samples
-Thin string
-Scissors
-Sharpie or colored marker
-Fancy hole punch (any shape is okay)


Step One: Decide on which paint sample colors you'd like to use. I chose to do pink/red.


Step Two: Cut them out so they're the desired shape of a bookmark. (This can be any shape - I just chose to make it a traditional rectangle.)


Step Three: Use your cutter to create a design in the bookmark. I chose to use one in the shape of a snowflake. Be sure to make your hole near the top so the bookmark can be hanging on a string.


Step Four: Using your marker or Sharpie, draw on the bookmark however you want. This is completely up to you, and no matter what you do, the outcome will look great! Also, secure your string onto the bookmark.


And now you will open up to the wrong page no longer! No more confusion! Yay! Again, this project was super easy to do, and I've found it to be extremely efficient. No matter what book you're reading, this bookmark will always look super cute sticking out of the top. You can even give this craft to one of your book-crazy friends! I certainly have a few (you know who you are), and I'm sure they'd love this. Happy reading, and... Stay crafty!


Thursday, September 15, 2016

DIY Hot Air Balloon Card

Hello everyone! Welcome back to my blog. I hope you're all having a wonderful day and are ready to create something new. This week's post is one of my favorites due to the fact that it is so easy, cute, and adorable! It can be done with nearly any type of paper and is great to present for all gift-giving occasions. Today, my friends, I am going to be creating a hot air balloon card! Fabulous, right? This simple yet effective craft takes no more than 10 minutes, and anyone you make this for is sure to love it! Let's get started!

What you will need:
-Cardboard
-Two shades of construction paper
-Scissors
-Heart stencil/ cut out
-White printer paper
-Black pen


Step one: Fold your cardboard into the shape of a card. Any size will do.


Step two: Using your heart stencil and construction paper, cut out one of each different colored hearts.


Step three: Apply the hearts onto the paper so that one half sticks up. Do this for both colors.


Step four: Using your white printer paper, make and glue clouds to the card wherever you see fit.


Step five: Use your black pen to draw on the basket of the hot air balloon.


And there you have it! An adorable hot air balloon card. Like I said before, this craft is perfect for any occasion and anyone who received it as a gift would surely love it. From birthdays to Valentine's Day, this DIY is ideal for letting someone know how  much you appreciate them. I hope you find this project as adorable as I do! Stay crafty!

Wednesday, April 27, 2016

DIY Mod Podge Frame

Hello everybuggy! I hope you're all having a fantastic day and are ready for another DIY craft idea! Recently, I've been needing a new place to display some of my pictures that do nothing but lye around in my room collecting dust. Also, I haven't done a project with mod podge in a while, so I thought: why not combine the two? Today, I am going to be making a beautiful mod podge frame! This project is short, sweet, and has an amazing outcome. Having the ability to completely customize this is just one of the many pluses of this craft! So whenever you're ready, we can begin!

What you will need:
-Frame
-Mod podge
-Decorated Paper
-Paintbrush


Step One: Take your paper and rip it up into small pieces. The smaller they are, the more detailed your frame will be.


Step Two: Using your paintbrush, paint mod podge all over the frame.


Step Three: Begin to place the pieces of paper on the frame. Don't worry about the excess that hangs off the edge - we'll take care of that later.


Step Four: Completely cover the frame in paper. Once done, fold the extra paper around the sides and add a final coat of mod podge to the project.


And now you  have your very own DIY mod podge frame! As I said before, this is the perfect decoration to display photographs in, and it definitely looks great wherever you put it. This could be your ideal centerpiece for a table, or even an eye catching work of art on the wall! You could gift this to a family member or friend with a picture of the two of you inside, or you could just keep it for yourself! I hope you enjoy completing this DIY and have a wonderful day. Stay crafty!